
Chapter 1: Get Started with Zenith AI
1.1: What is Zenith AI?
Zenith AI is an multi-model AI platform that brings world’s leading AI models into one simple place. Zenith AI is that one platform that help you by not switching between different AI tools at different times, allowing you to explore, use, and compare them through one platform.
It’s suitable for you if you’re a student, writer, programmer, want to brainstorm an idea, or just curious, Zenith AI helps you find the right AI for the task - without making the experience complicated.
1.2: How to Create an Account on Zenith AI
Ready to explore Zenith AI? Getting started is easy. Follow these simple steps to choose your plan, complete your payment, and begin your AI journey.
1. Getting Started with Zenith AI
Visit the Zenith AI homepage and click the Get Started button at the top right of the screen.

You'll be taken to the account creation page. You can sign up using your Google account or register with your email address.
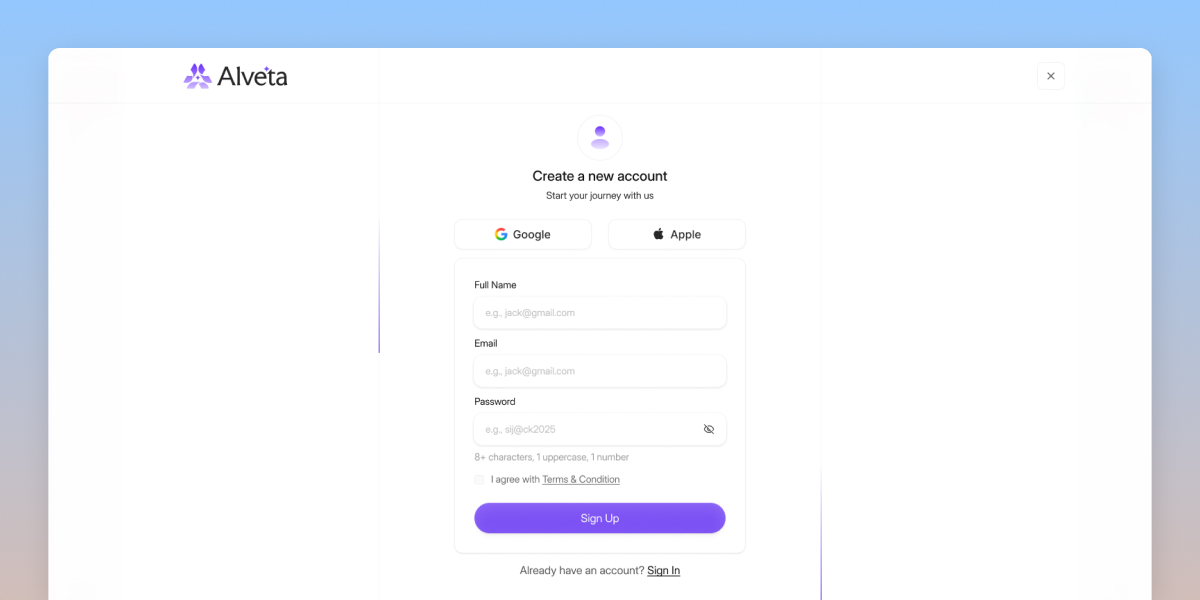
If you choose email registration, enter your full name, email, preferred currency, and password. Then click Sign Up.
3. Choose Your Plan
After creating your account, you'll see Zenith AI's available pricing plans. Take a look at the features and AI models included in each plan, then choose the one that fits your needs.

Click Get Started under your preferred plan.
4. Choose Your Payment Method
You'll now be taken to the payment page. Depending on your region, you may see different payment options, including Stripe or local mobile financial services (MFS).
Choose your preferred payment method and continue.
5. Complete Your Payment
Zenith AI currently supports payments in both USD and BDT. You can pay through Stripe, make a BDT payment via bank transfer, or use local mobile financial services such as bKash, Upay, and Rocket, along with other available options.
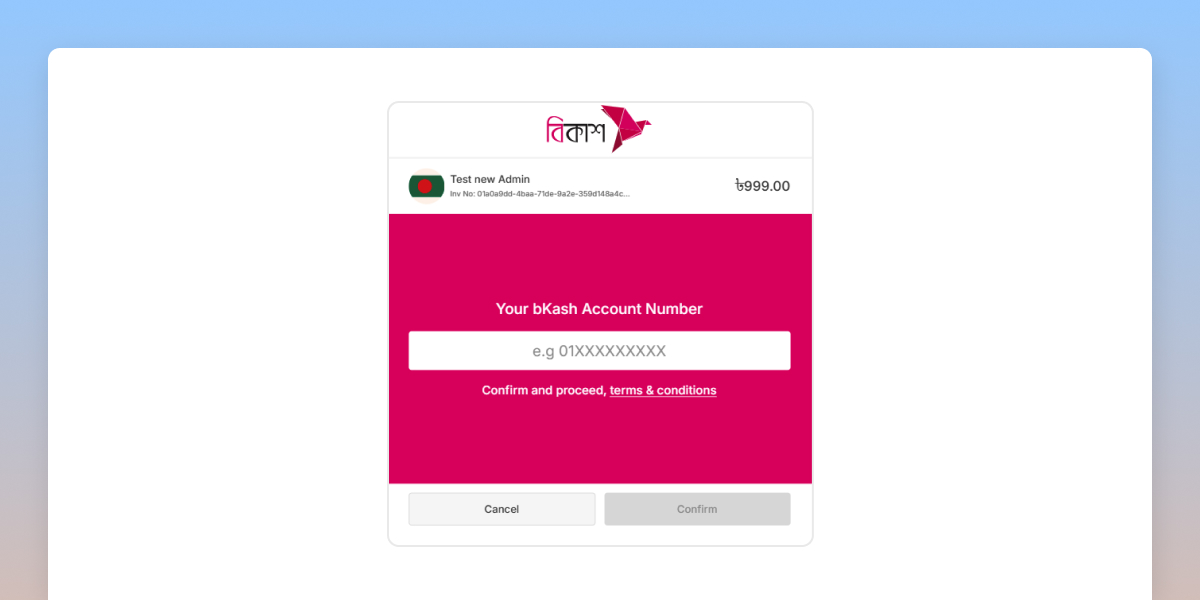
Paying with a local MFS?
Select your preferred service, such as bKash, and follow the instructions. You will need to enter your mobile number and confirm the payment using your PIN or passcode.
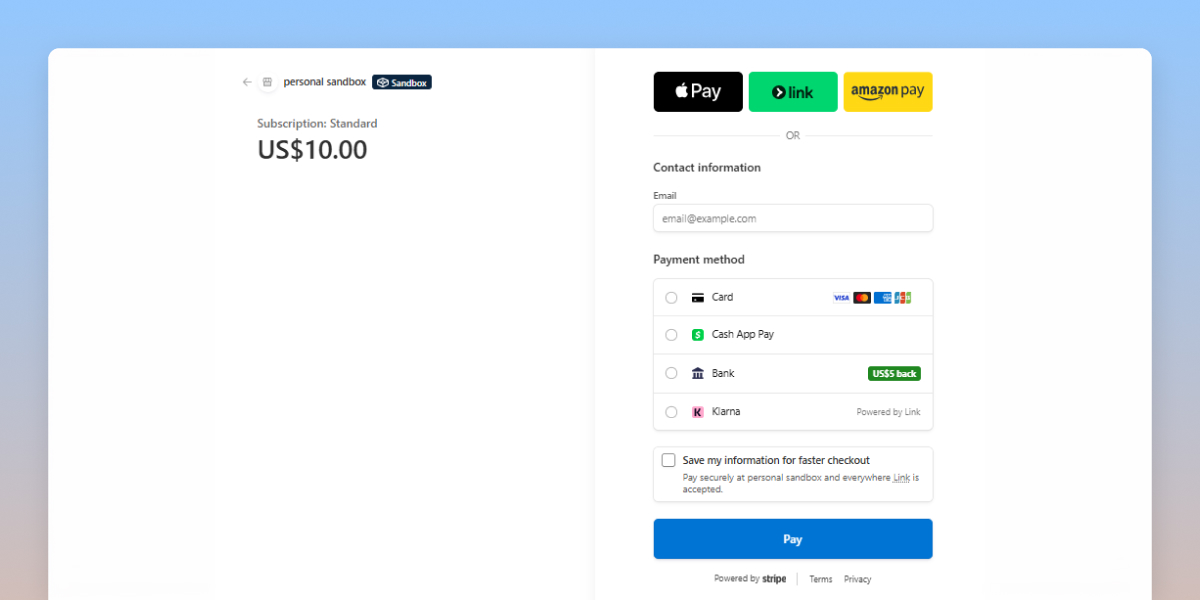
Paying with Stripe?
Choose your preferred option, such as a card, Google Pay, or Apple Pay, where available. Fill in the required payment details and complete the checkout.
6. You're All Set!
Once your payment is confirmed, your selected plan will be activated.
Congratulations! You've just bought your first Zenith AI plan!
Now you're ready to explore AI, create, compare, and get more done, all in one place.
Chapter 2: Meet Your Zenith AI Workspace
Once you're inside Zenith AI, you'll find everything you need to work. You can start new chats, organize your work into projects, use private conversations, choose your AI model, compare responses, and upload files.
Let's take a quick tour.
2.1: Start a New Chat
Want to ask a question, brainstorm an idea, or work on something new?
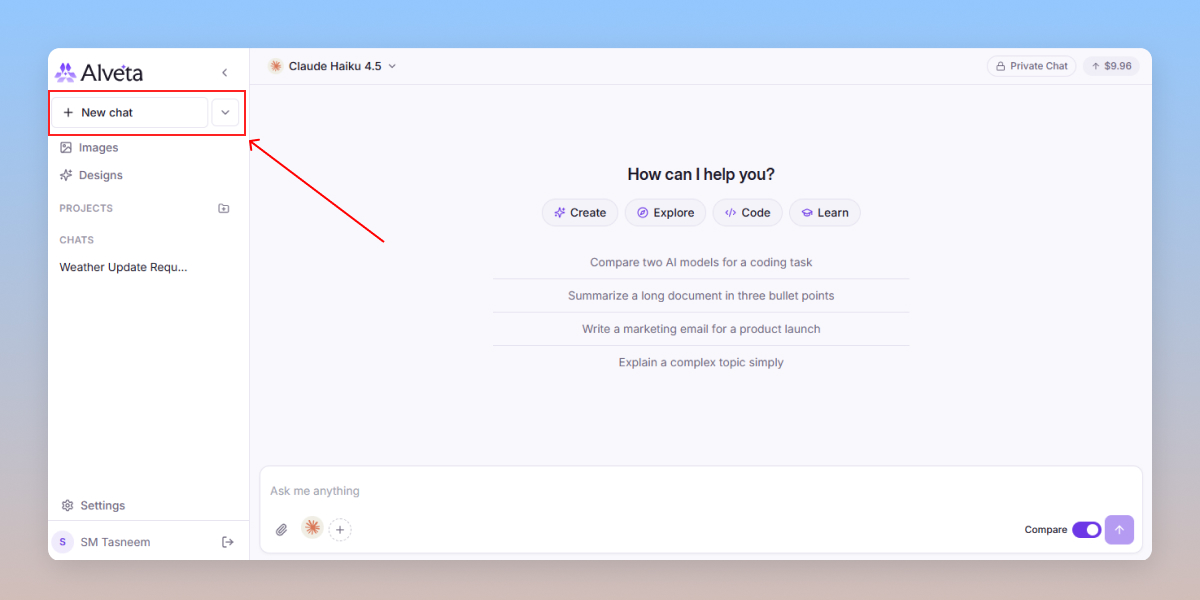
Click New Chat in the left sidebar. This opens a fresh conversation where you can choose an AI model and start chatting.
2.2: How to Create Projects?
Working on something that involves multiple conversations? You can create a Project to keep related chats and work organized in one place.
For that click on the ‘plus’ button after projects, name it, and save.
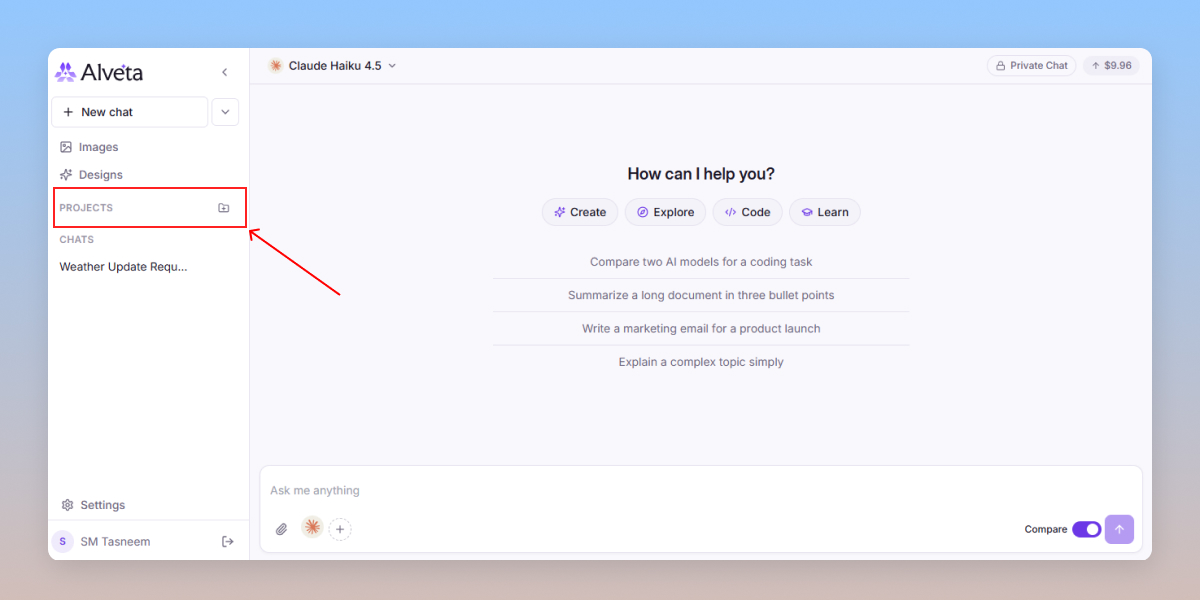
Projects are useful for keeping your studies, research, writing, coding, or other ongoing work together.
2.3: How to Create a Private Chat?
Need a conversation that won't stay in your chat history forever?
Click the dropdown beside the New Chat button and choose the option to create a Private Chat. You can set an expiration time of up to 24 hours. Once the selected time is reached, the private chat is permanently deleted.
Forgot to set an expiration time? No worries. Private chats are automatically deleted after 24 hours.
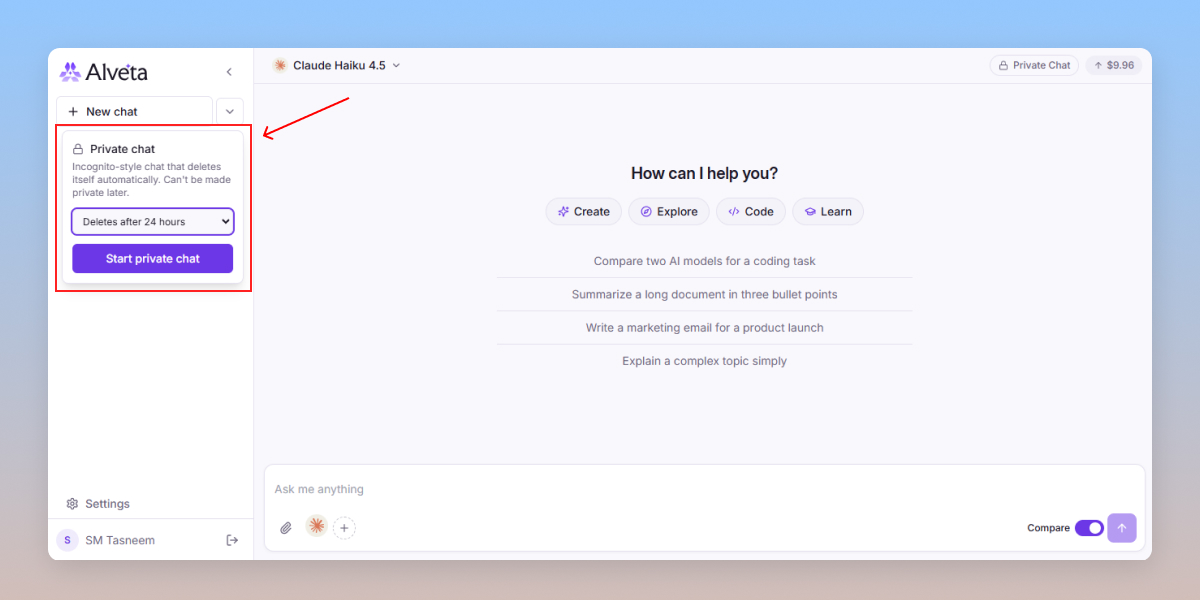
Keep in mind: Once a private chat is deleted, it cannot be recovered.
2.4: How to Choose Your Default AI Model?
Ready to start chatting? Here's how to choose which AI responds.
- Look at the model dropdown in the top-left area of the chat interface.
- You'll see the AI models available under your current plan.
- Select the model you want to use.
- Type your prompt and send it.
That's it. Your selected AI will respond to your prompt.
2.5: How to Compare Multiple AI Model Outputs?
Want to see how different AI models answer the same question? Zenith AI lets you compare their responses in one chat.
Here's how:
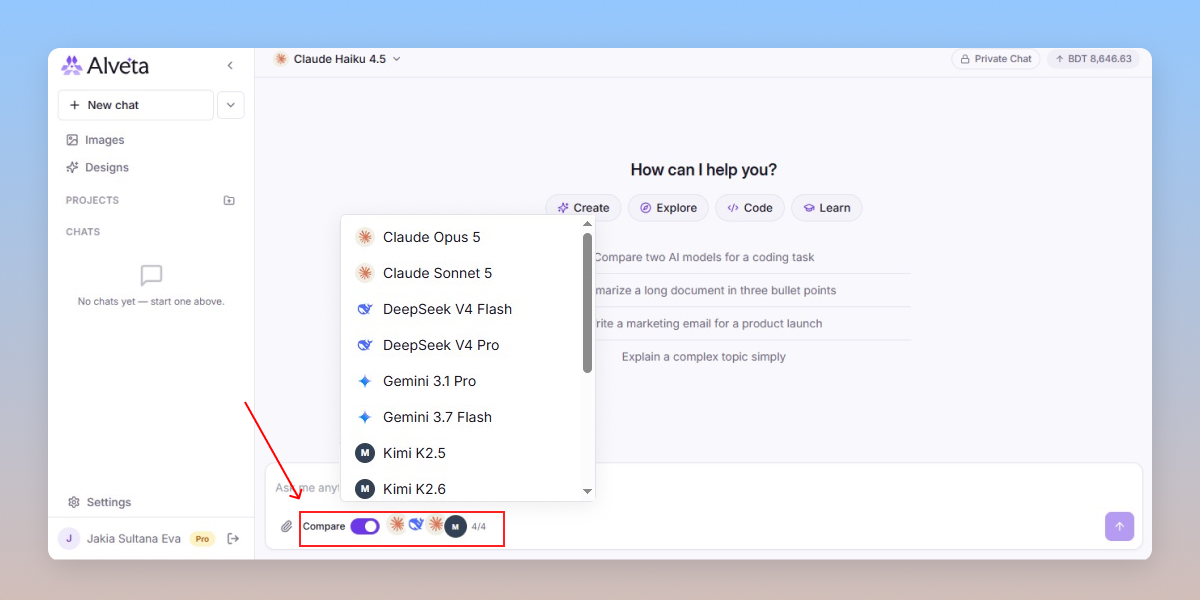
- Open the chatbox and find the Compare option.
- Enable Compare to turn on the comparison feature.
- Click the plus (+) button in the lower-left area of the chatbox.
- Select the AI models you want to compare.
- Write your prompt and send it.
Zenith AI will show the responses from your selected models together, making it easier to explore their differences and decide which response works best for you.

Note: You can compare up to 4 AI models at a time.
2.6 - Can I Upload Files to Add Context?
Need help with a document, image, presentation, or another file? You can upload files directly into your chat and ask an AI to work with them.
Depending on the supported file types, you can upload files such as:
- Images
- PDFs
- ZIP files
- PowerPoint presentations (.pptx)
- Other supported formats
After uploading a file, you can ask the AI to summarize it, explain something, extract information, review its content, or help you work with it.
Tip: If you're unsure whether a file type is supported, try uploading it or check the latest supported-format information in Zenith AI.
Chapter 3: Accounts, Plans, & Billing Histories
Zenith AI gives you a simple way to manage your account details, check your current plan, review your wallet balance, and keep track of your payments. Here's how to find everything you need.
3.1: Settings
To access your account and billing options, open Settings from the bottom-left corner of your Zenith AI workspace.
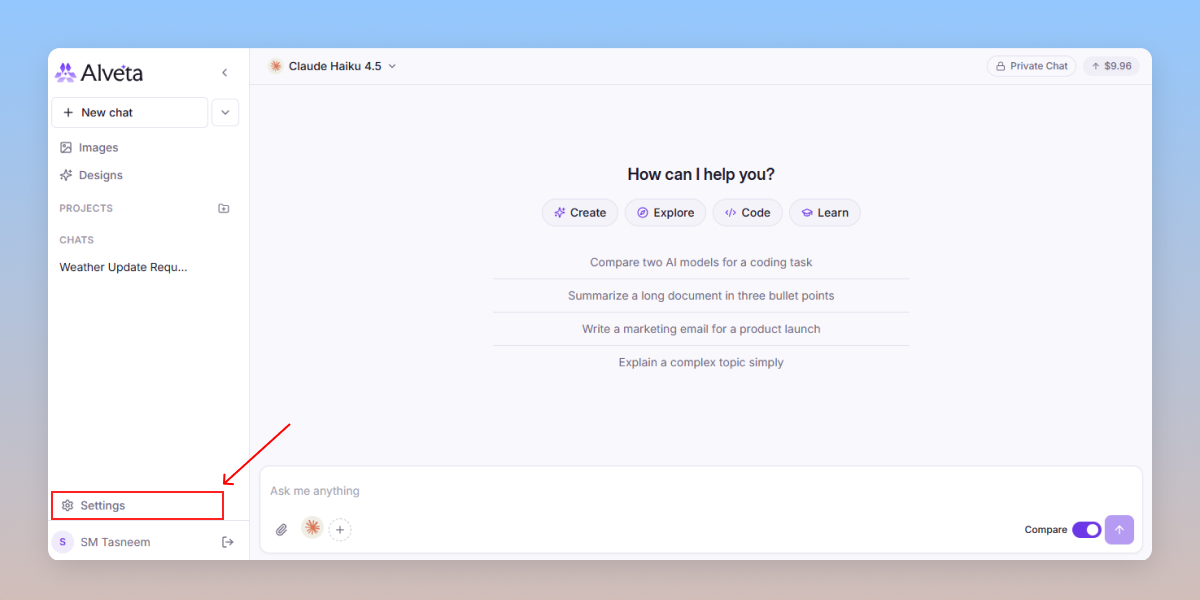
You'll find several sections in the Settings menu, including:
- Account
- Billing
- Wallet
- Usage
- Plans
Each section helps you manage a different part of your Zenith AI experience.
3.2: Manage Your Account
Click Account to view your account information at a glance.
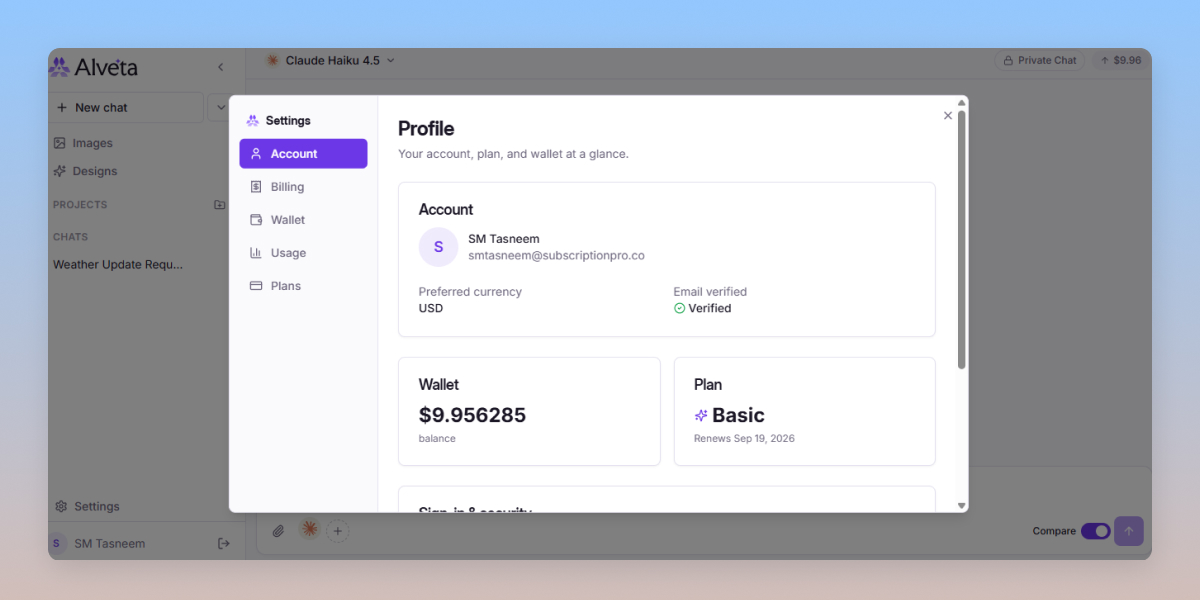
Here, you can:
- Change your name and email address
- Change your preferred currency
- Change email verification status
- Check your current wallet balance
- Check your active subscription plan
- Check your plan renewal date
3.3: Check Your Billing History
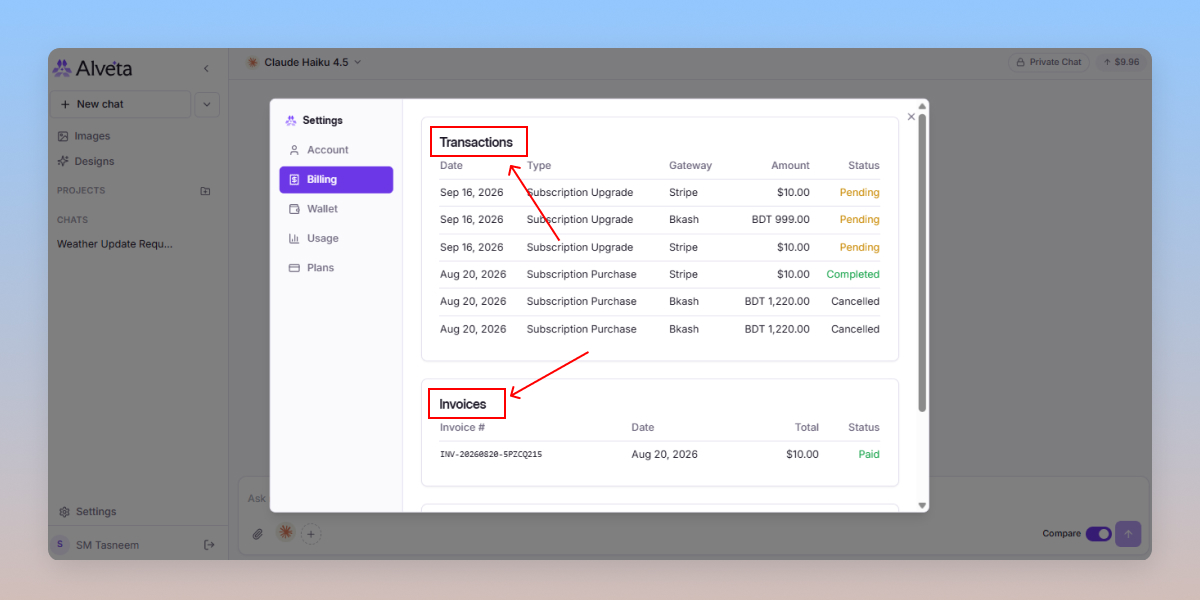
Want to know where your money went? The Billing section keeps your payment history organized.
You can review transactions such as:
- Subscription purchases
- Wallet top-ups
- Payment gateways used
- Transaction amounts
- Payment status
This makes it easier to keep track of your Zenith AI payments in one place.
3.4: View Your Invoices & Receipts
The Billing section also includes Invoices and Receipts. You can use these records to review details such as:
- Invoice or receipt number
- Payment date
- Transaction type
- Amount paid
- Payment status
These records are useful when you need to check a previous payment or keep your billing information organized.
Chapter 4: Manage Your Wallet & Top Up
Your Zenith AI wallet makes it easy to add funds and use them for your AI activities. From the Wallet section in Settings, you can check your current balance and add more funds whenever you need them.
4.1: How to Check Your Wallet Balance
Open Settings → Wallet to view your available balance.
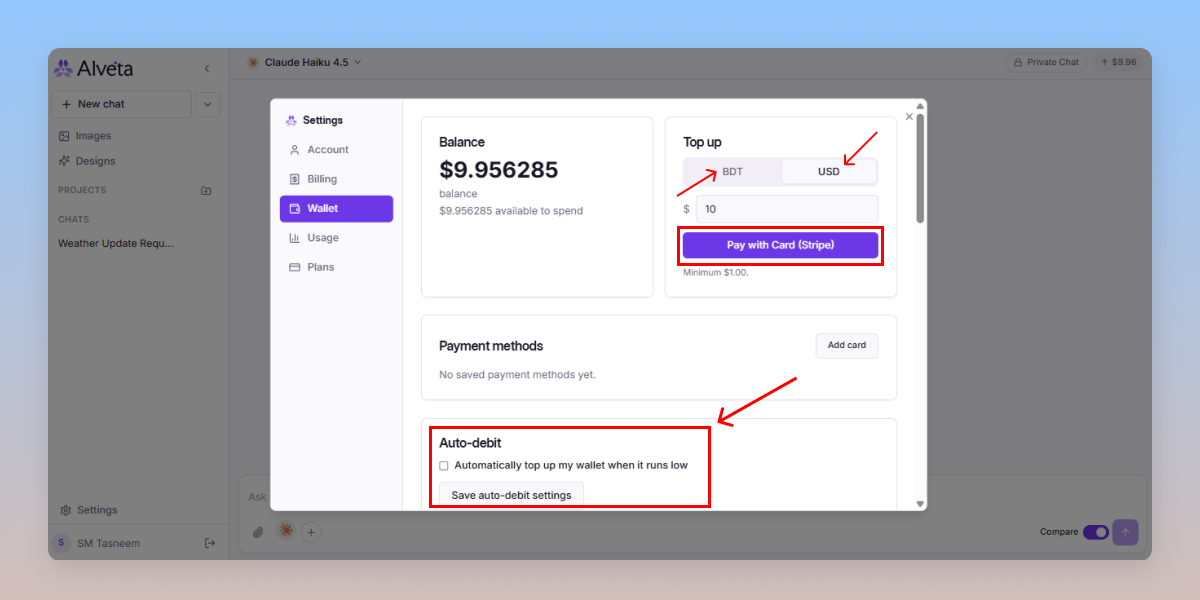
The Wallet page shows how much credit you currently have available to spend. You can also find the Top Up option on the same page.
4.2: How to Top Up Your Wallet?
Need to add more funds? Just follow these simple steps:
Step 1: Open your Wallet
Go to Settings → Wallet from your Zenith AI workspace.
Step 2: Enter your top-up amount
In the Top Up section, enter the amount you'd like to add.
Step 3: Choose your payment method
Depending on the available options in your region, you can top up using:
- Card through Stripe — charged in USD
- Local mobile financial services (MFS) — such as bKash, Upay, Rocket, and other available options, charged in BDT
Step 4: Complete your payment
Follow the instructions for your selected payment method. Once the payment is confirmed, your wallet balance will be automatically added.
Chapter 5: Frequently Asked Questions
Can I top up my wallet anytime?
Yes, you can top up your wallet anytime and add any amount you want, subject to the available limits. Just remember that depending on your payment method, additional payment or processing charges may apply.
Can I buy a plan once and keep topping up my wallet?
Yes, you can top up your wallet whenever you need more funds. However, your wallet balance and subscription plan are separate. Topping up your wallet does not automatically replace an active subscription if one is required for the models or features you want to use.
Can I get a refund?
Refunds depend on the applicable payment and refund policy. If you need a refund, contact Zenith AI support with your payment details, and the team will review your request.
Is there an auto-payment option in Zenith AI?
Auto-payment or subscription renewal depends on the payment method and the options available at checkout. Please check the payment page or your subscription settings for the current options.
Can I see my current AI usage?
Yes. Go to Settings → Usage to check your current usage and the available usage information for your account.
Does Zenith AI have a free tier?
No. Zenith AI currently does not offer a free tier. You need to purchase an available plan to access its AI services.
What AI models are currently available on Zenith AI?
Zenith AI offers multiple AI models, and availability depends on your plan. Current models include GPT, Claude, Gemini, DeepSeek, Grok, Kimi, and Perplexity models. You can visit the Models section to explore the latest available options.
Can I use multiple AI models at the same time?
Yes. Zenith AI's Compare feature lets you select multiple models and view their responses together.
How many AI models can I compare at once?
You can compare up to 4 AI models at a time.
Can I upload files to Zenith AI?
Yes. You can upload supported files, including images, PDFs, ZIP files, PowerPoint presentations, and other available formats.
Can I change my email address or password?
Yes. Go to Settings → Account → Sign-in & Security to change your email address or password.
Can I cancel my subscription?
Yes. You can manage or cancel your subscription through the available options in Plans or Billing.
Can I create a private chat?
Yes. You can create a private chat from the dropdown beside New Chat and set an expiration time of up to 24 hours. If you don't set a time, the private chat will automatically be deleted after 24 hours.
How to Check Your Token Usage?
Go to Settings → Usage in your Zenith AI account. Choose 7 days, 30 days, or All time to view your total tokens, spending, and usage by model. You can also check your token usage history for up to 30 days to track how many tokens you've used and how many remain available.